
To connect to a remote Microsoft Windows Virtual Private Network (VPN) when you are behind a firewall you need to first open up some ports on the firewall. If you are using a personal firewall on your Windows PC (such as Kerio Personal Firewall or Zone Labs ZoneAlarm) it is most probably just a matter of allowing the connections when the popup windows appear when you attempt to connect to the VPN.
If you have a router or external firewall on your network then you will need to connect to the configuration application (for a lot of home routers this is usually through a browser based administration system) and add the settings manually. All you need to do is to open up port 1723 and IP protocol ID 47, which will allow PPTP (Point to Point Tunneling Protocol) access through your firewall.
An example of adding this setting to allow Virtual Private Networking through a firewall is shown in the screenshots below. These are taken from the web administration of a Dynalink RTA220 ADSL router, but the basic approach to adding these settings should be the same for most commercial home routers.
On the RTA220 select “Configuration” then “Security” and hit the “Create a New Filtering Rule” button. You will then see a screen similar to the one shown in the screenshot below.
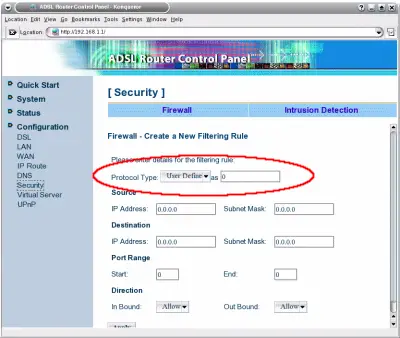
The section that is circled in red in the screenshot is where you set the IP Protocal ID. Normally you would set this to TCP or UDP and add a port number to the range boxes (such as 80 to allow outbound and/or inbound web requests). To allow access to protocol ID 47 you would leave this a “User Define” and type “47” into the text box next to the drop down box. Make sure the “Inbound” and “Outbound” drop down boxes are set to “Allow” and then save the changes by clicking the “Apply” button.
Then repeat to add TCP port 1723. This time select “TCP” from the “Protocol Type” drop down box and type “1723” into the text box next to it. Again make sure the “Inbound” and “Outbound” drop down boxes are set to “Allow” and then save the changes by clicking the “Apply” button.
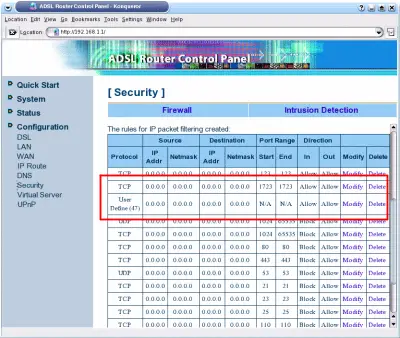
At this stage the list of ports should include both IP protocol 47 and TCP port 1723 for both inbound and outbound connections as shown in the highlighted section in the screenshot below.
At this point you should now be able to connect to the remote Virtual Private Network. Most routers will only store this in memory so remember to use the option to save it to non-volatile memory (on the RTA220 this is under “System” then “Save Configuration”). By doing this your settings will be remembered if the router has to restart.